- 516 Update
- Posts
- Your Guide to Clamming on Long Island: Permits to Prime Spots in Nassau County, NY
Your Guide to Clamming on Long Island: Permits to Prime Spots in Nassau County, NY
Your essential guide to clamming Long Island. Find the best spots in Nassau County, get your permit, and learn the tips you need for a perfect day on the bay.
516 Update
January 14, 2026

Wading into the calm, shallow waters of Nassau County’s Great South Bay with a rake in hand is a cherished local tradition. In communities from Seaford to Massapequa, clamming is a rewarding way to get outdoors and connect with our area's maritime roots. This guide provides actionable information for residents looking to try this classic Long Island activity, perfect for creating lasting family memories.
Rediscover a Cherished Nassau County Tradition
Clamming in Nassau County, NY, is more than a hobby; it’s a living link to our area's rich history. For anyone living in towns like Merrick, Seaford, or Wantagh, the simple act of digging for clams connects you to a practice that has sustained local families for centuries. It’s an activity that gets you outdoors and—if you’re lucky—ends with a delicious, locally sourced meal.
This practice is deeply woven into our local identity. Long Island's clamming industry hit its golden age back in the 1970s, when more than half of all hard clams eaten in the United States came straight from our local waters. At their peak, the clams in the Great South Bay were so plentiful they filtered an incredible 40 percent of all the water in the bay, which just goes to show how vital they are to our ecosystem.
From Historic Industry to Family Fun
While the massive commercial clamming industry has changed over the years, the recreational spirit is stronger than ever. Today, clamming in Nassau County is less about big business and more about the experience. It’s about teaching your kids where their food comes from, enjoying a sunny afternoon out on the flats, or just finding a quiet moment in nature. It’s a tradition that builds a real appreciation for our local environment.
For many Nassau County families, a successful day of clamming isn’t just measured by the weight of their basket but by the quality of the time spent together on the water.
This guide will walk you through everything you need to know to get started. We'll cover the essential permits, the best gear for the job, and how to find those perfect, clam-rich spots. You’ll learn how to embrace a beloved piece of local culture that’s both fun and fulfilling. Our comprehensive look into Nassau County history provides even more context on what makes our region so unique.
Before we dig in, here's a quick checklist to give you a bird's-eye view of what's needed to start your clamming adventure in Nassau County, NY.
Your Nassau County Clamming Checklist
Here’s a quick overview of what you need to start clamming on Long Island, from permits to essential gear.
Essential Step | What You Need to Know | Where to Go (Example) |
|---|---|---|
Get Your Permit | A town permit is usually required. Check your local town's rules (Hempstead, Oyster Bay, etc.). | Town of Hempstead Clerk's Office |
Check Season & Tides | Clamming is best at low tide. Seasons are open year-round, but check for local closures. | Great South Bay (near Wantagh or Seaford) |
Gather Your Gear | A clam rake, basket or bucket, and protective footwear are must-haves. | A local bait and tackle shop |
Know the Rules | Follow size and quantity limits to keep the clam population healthy for everyone. | Minimum size is 1 inch thick. |
This table covers the basics, but the real fun is in the details. Ready to start your own clamming adventure? Let's get into it.
Your Ticket to the Bay: Local Clamming Permits and Rules
Before you can dig your toes in the sand and start hunting for clams in Nassau County, NY, you’ve got to get your paperwork in order. A clamming permit is your official ticket to the bay—an essential first step to clam legally and help protect our local waters.
The rules are hyper-local. Unlike a single, state-wide fishing license, clamming permits are issued by individual townships for their specific waters. That means a permit from the Town of Hempstead won't work in the Town of Oyster Bay, and vice-versa.
Getting Your Town Permit
First, figure out where you’ll be clamming. If you live in Seaford or Wantagh, you'll be heading to waters managed by the Town of Hempstead. If you're over in Massapequa or Farmingdale, you fall under the Town of Oyster Bay.
Here’s the rundown on what to do next:
Prove You're a Local: Most towns require you to be a resident to get a recreational shellfish permit. You’ll need to show proof, like a driver's license or a recent utility bill.
Visit the Town Clerk: For instance, the Hempstead Town Clerk's office is at One Washington Street in Hempstead. It’s always smart to call ahead or check their website for current hours and exactly what you need to bring.
Pay the Fee: The good news is that permits are very affordable, usually less than $20 for the entire year. Seniors often get a discount or even a free permit, so be sure to ask.
Once you have that permit, you must have it on you anytime you're out clamming.
The Rules of the Rake
Getting the permit is only half the process. You also need to know the rules of the bay, which are in place to keep clam populations healthy for everyone. They’re straightforward but are strictly enforced.
The big one is the daily catch limit. For recreational clammers, the limit is one peck per person, per day. A peck is two gallons, or about a quarter of a bushel—more than enough for a family dinner.
Another crucial rule involves the minimum size for hard clams.
Littlenecks & Cherrystones: These must have a shell that is at least one inch thick right at the hinge.
Why It Matters: This regulation ensures smaller, younger clams get a chance to grow and reproduce, ensuring a sustainable fishery for the future. A clam gauge, available at any local bait and tackle shop, is the easiest way to measure.
Pro Tip: Always check the official NYSDEC website for shellfish harvesting closures before you go. Water quality can change fast, especially after heavy rain, and areas can be temporarily closed for safety.
Staying informed is part of being a responsible clammer. For more on what's happening in our local waters, check out our recent report on Oyster Bay water quality.
Getting Your Gear Together: What You'll Need
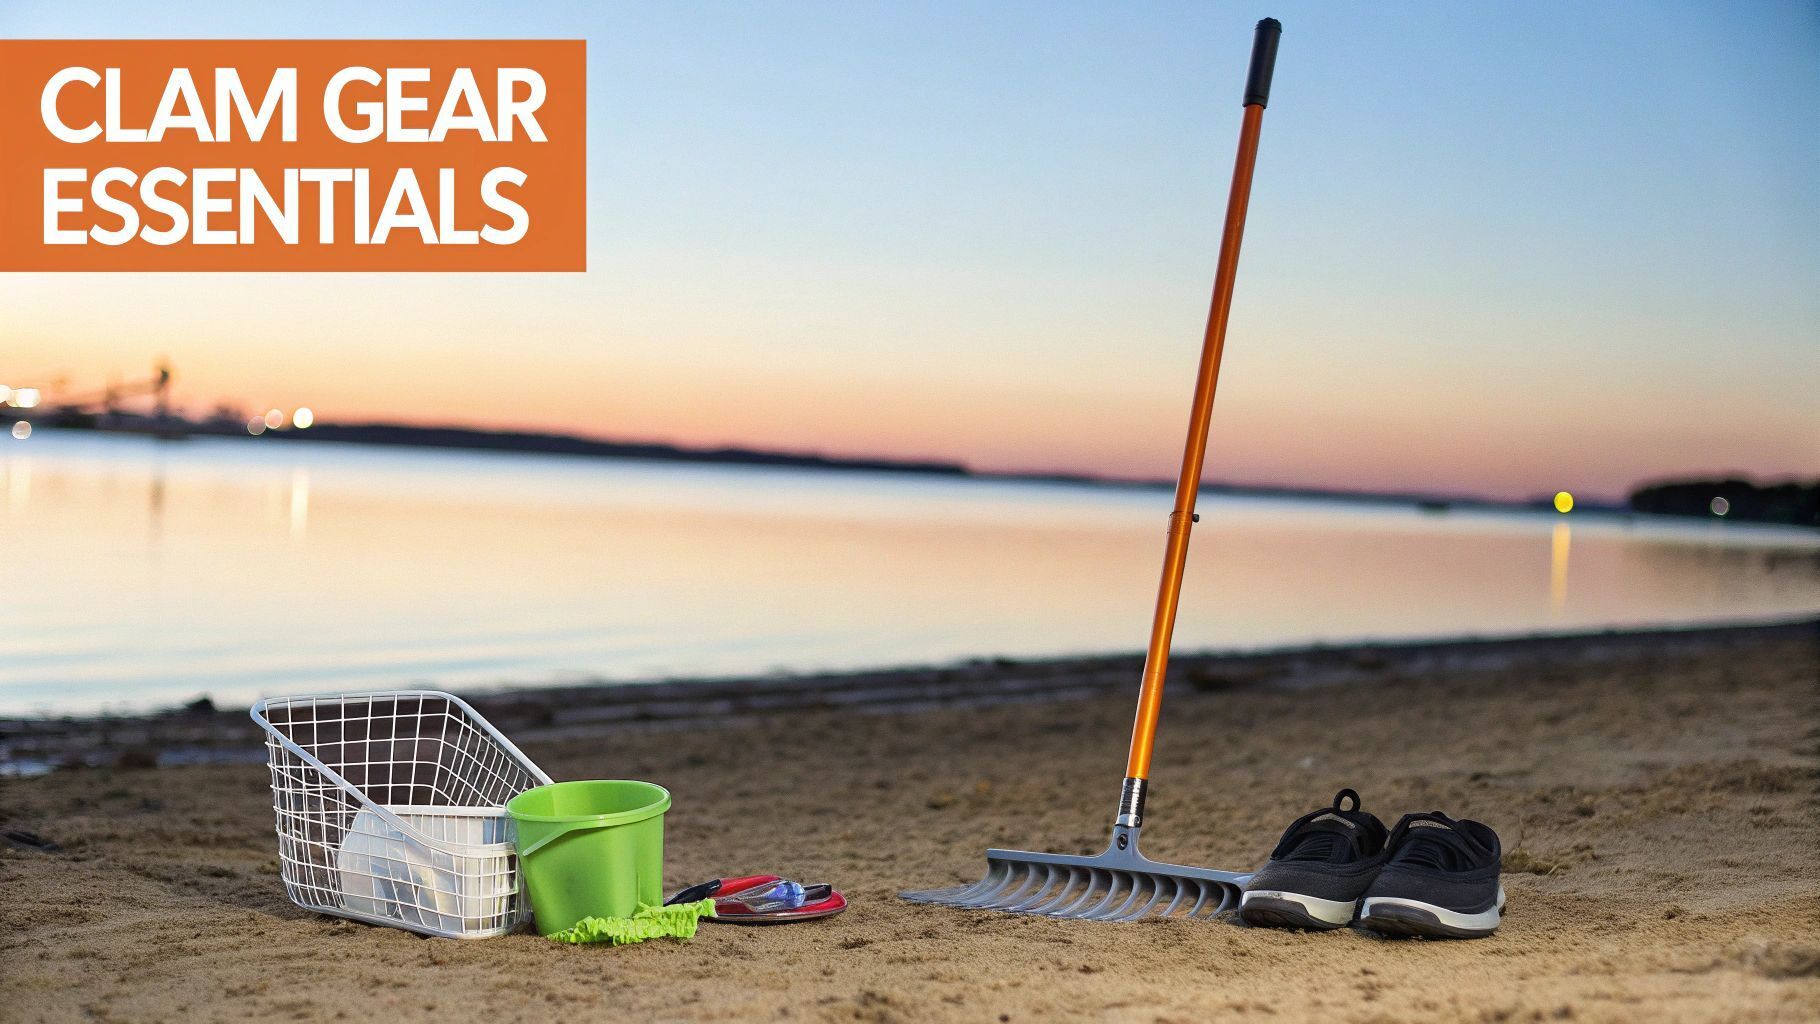
You've got your permit sorted. Now for the fun part: getting your gear ready. You don’t need a lot of fancy equipment, but having the right tools makes all the difference between a frustrating day and a bucket full of fresh clams. This is about working smarter, not harder, out on the flats.
The Tools of the Trade
First, you need a clam rake. Walk into any local Nassau County tackle shop and you'll see a few different styles, but most Long Islanders stick to one of two main types.
The Classic Long-Handled Basket Rake: This is your workhorse. The long handle saves your back, and the built-in basket sifts out the mud and sand as you pull it through the bottom. It’s perfect for wading in water up to your knees.
The Handheld Scratch Rake: This is a smaller rake that's fantastic for shallow spots. It gives you a better feel for the bottom and is great for kids to dig around in the shallows.
Once you start pulling clams, you'll need somewhere to put them. A standard 5-gallon bucket works, but a wire mesh basket that floats is even better. You can swish it around in the water to rinse your clams as you go.
Don't go out there without a clam gauge. It’s a simple but essential tool that ensures every clam you keep is over the legal 1-inch thickness at the hinge. Keep one in your pocket to protect the clam population for next year.
What to Wear for a Day in the Bay
Protecting yourself from the elements is just as important as having the right rake. You'll be walking on sand, mud, and broken shells, so footwear is a big deal. A good pair of water shoes or neoprene booties offers better grip and protection than old sneakers.
Here are a few other things to bring:
Gloves: A pair of rubberized work gloves will save your hands from getting scraped up.
A Cooler: Toss some ice packs into a small cooler and put your clams in there as soon as you're done. Keeping them cold on the ride home is key to freshness.
Sun Gear: A wide-brimmed hat, polarized sunglasses, and waterproof sunscreen are non-negotiable, even on cloudy days.
If you’re looking for more ways to get out on the water, take a look at our complete guide to fishing on Long Island.
Where to Go: Finding Nassau County's Best Clamming Spots
Alright, you've got your permit and your gear. Now for the most important part: location. Knowing where to dig in Nassau County separates a nice walk on the beach from a bucket full of fresh clams for dinner. Our local bays are full of fantastic, easy-to-reach spots that are perfect for beginners and seasoned pros alike.
It's All About the Tides
Before mentioning a single town, we have to talk about the single most important factor for success: the tides. Clams bury themselves in the intertidal zone—the stretch of bay bottom that gets exposed when the water pulls back. You must go at low tide to reach the clam beds.
The sweet spot is low tide. Plan to get to your spot about an hour before peak low tide. This gives you plenty of time to work the flats as the water is at its lowest.
Experienced clammers plan their entire day around the tide chart. They know timing is everything.
You can easily check the tides on websites and apps. I personally use Saltwater Tides or the Tides Near Me app. Just search for a local landmark like "Jones Inlet" or "Wantagh Park" to get the precise times for your trip.
Top Nassau County Clamming Locations
While most clammers keep their favorite honey holes a secret, there are plenty of well-known public areas in Nassau County that consistently produce. For general info on parking and access, you might also want to check out our guide on public beaches in Nassau County.
Here's a quick comparison of some popular spots to get you started.
Location (Town) | Best For | Bottom Type | Parking & Access Notes |
|---|---|---|---|
Tobay Beach (West End) | Families & Beginners | Firm Sand | Town of Oyster Bay permit required for parking. Easy walk to huge, open flats on the bay side. |
Wantagh Park | Convenience & Mixed Bag | Sand & Mud | Nassau County park with easy parking. Good access near the fishing pier, amenities are a plus. |
The "Narrows" (Seaford) | Experienced Clammers | Mixed Sand/Mud | Local favorite with strong currents. Access from various neighborhood points. Can be very productive. |
These spots are local mainstays for a reason. Tobay Beach, on the bay side, is fantastic for families. At low tide, massive sandy flats open up, and the firm bottom makes for easy walking and raking. Wantagh Park is another solid bet, offering incredibly easy access right from the park. For those looking for a classic South Shore experience, the area known as "The Narrows" in Seaford is a local hotspot. The currents that run through here keep the clams well-fed and plentiful.
Mastering the Art of Finding Clams
You've made it to one of Nassau County's best clamming spots, gear in hand. Now for the fun part: actually finding those clams. This isn't just about luck; it's about technique. The whole game is learning to feel the difference between a rock, an old shell, and the solid, rounded shape of a live clam. It's a knack you'll pick up faster than you think.
Think of it as a simple three-part process: Park, check the tides, and get raking.
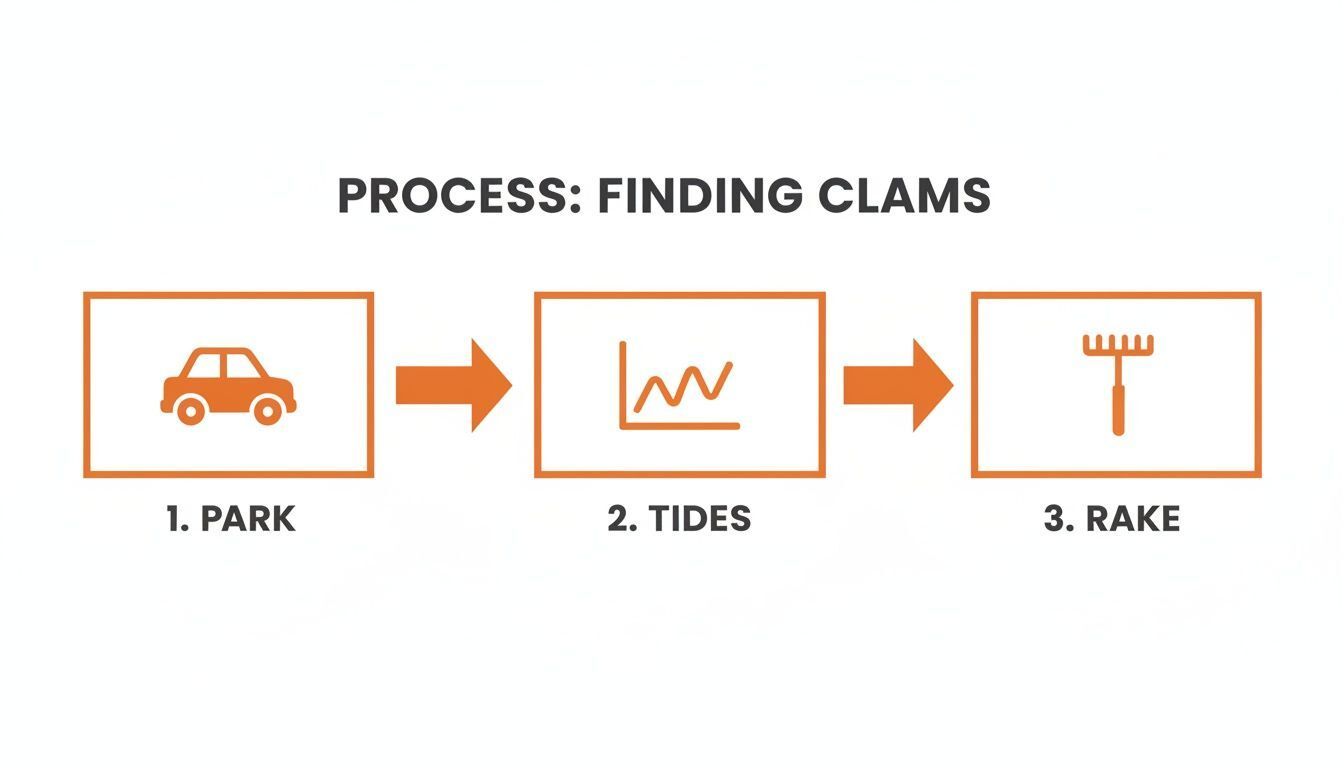
As you can see, a successful day starts before your boots even get wet. It's all about planning.
Proven Clamming Techniques
One of the most effective methods doesn't even involve a tool: the "clam shuffle." Wade into shin-deep water and slowly shuffle your feet, digging them an inch or two into the sandy bottom. You’re literally feeling for that unmistakable hard, disc-like object. That's a clam.
When you're ready to break out the rake, remember it's about finesse, not force. Pull the rake toward you in a slow, steady motion. Keep the tines angled down just enough to bite a few inches into the sand. You're listening and feeling for that satisfying "clink" when metal hits shell.
Pro Tip: Keep an eye out for a "clam show." These are tiny, keyhole-shaped holes or dimples in the sand. This is a dead giveaway that a clam is buried right below, with its siphon reaching up to feed.
From Finding to Filling Your Basket
The moment you feel that clink or spot a clam show, stop and work that small area. Use your rake or hands to gently unearth your prize.
Before it hits your basket, grab your clam gauge. Measure every single one to make sure it's legal size. It only takes a second and it's absolutely crucial.
It’s these simple, hands-on skills that make clamming so addictive. Looking for more local fun? Check out our events page for the latest happenings around Nassau County.
Keeping Our Bays Healthy and Clammers Safe

Getting out on the water and digging for your own dinner is one of Long Island’s greatest pastimes. But with that privilege comes a responsibility—to yourself and to the delicate marine ecosystems that make it all possible. Following a few simple rules ensures that clamming in Nassau County remains a safe, sustainable tradition. It’s about more than just a fresh meal; it’s about being a good steward of our local environment.
First Things First: Check the Water Quality
Your safety is paramount. Before you go, you must check the official status of the clamming grounds. The New York State Department of Environmental Conservation (DEC) is your go-to source for the latest updates on shellfish harvesting closures. Heavy rainfall is a major trigger for temporary closures, as it washes pollutants from land into the bays.
The most critical safety step you can take is checking the DEC’s interactive map for shellfish closures. If an area is marked uncertified, it’s closed for a reason—never harvest there.
Water quality is an ongoing issue on Long Island. Things like harmful algal blooms can impact the clam population, and it’s a constant reminder of why local restoration efforts are so vital.
Good Clamming Etiquette: Leave It Better Than You Found It
Being a responsible clammer is simple. It just means showing a little respect for the environment and for other people.
Fill In Your Holes: This is a big one. After you’ve raked an area, use your foot or rake to smooth the sand back over. It keeps the bay floor stable and safe.
Respect the Limits: Those size and catch limits aren't arbitrary. They're scientifically determined to ensure a healthy population for the future.
Pack It Out: Whatever you bring with you needs to go home with you. Leave nothing behind but your footprints.
These small habits make a huge difference. To see how these efforts get a boost, you can read about recent funding to protect Oyster Bay’s shores. It really is a community-wide effort.
Curious about what else is going on around town? Check out our Nassau County events page for more family-friendly fun.
Long Island Clamming: Your Questions Answered
Alright, let's tackle some of the most common questions that pop up for folks new to clamming in Nassau County. Getting these details sorted out beforehand will make your first trip out on the bay a whole lot smoother.
What’s the Best Time of Year to Go Clamming?
You can technically clam year-round, but the sweet spot is late spring through early fall, from May to October, when the water has warmed up.
But here’s the real pro tip: the tide is way more important than the calendar month. You must plan your trip around low tide. That’s when the clam flats are exposed, making it much easier to find what you're looking for.
How Do I Know if the Water Is Safe for Harvesting?
This is the most important question. Your safety comes first, and that means knowing the water quality before you go.
Before every single trip, you must check the New York State Department of Environmental Conservation (DEC) for shellfish harvesting closures. They have an interactive map of certified and uncertified waters that shows temporary closures, which often happen after heavy rainstorms. If an area is marked "uncertified," it's permanently off-limits. No exceptions.
Expert Tip: Bookmark the DEC's shellfish closure page on your phone. A quick 30-second check is all it takes to ensure you’re harvesting safely.
How Should I Clean My Clams After I Get Home?
Nothing ruins a fresh clam dish faster than a mouthful of sand. The secret is to "purge" your clams before cooking them.
First, get your clams into a bucket of cold saltwater. If you don't have bay water, you can make your own with non-iodized salt.
Stick the bucket in the fridge for a few hours, or even overnight.
While they sit, the clams will naturally filter out any sand and grit.
Once they’re done purging, just give the outside of the shells a quick scrub with a stiff brush, and they're ready to go.
What if I Find a Clam That’s Already Open?
As you're sorting your catch, you’ll probably find some clams with their shells slightly agape. Give the shell a firm tap.
A healthy, live clam will snap its shell shut almost immediately. If it stays open or closes very slowly, it’s no good—throw it out. You should also discard any clams with cracked or broken shells.
516 Update keeps you connected to everything happening in our community. Don't miss out on local news, family-friendly activities, and guides like this one. Subscribe to our free daily newsletter and stay in the loop.